Using Ghost with Aspire
When I decided that I wanted to spin up WithAspire(); I had to decide what content platform I would use. I've used a few over the years but one of the ones that I enjoyed using the most for its simplicity is Ghost.
Ghost is an open-source publishing platform built on top of Node.js that uses Express and gives the option of SQLite or MySQL as a datastore.
Once I decided that I wanted to use Ghost I had to choose between paying for a managed hosting option or whether I wanted to self-host it. In the end I decided to use the Ghost-teams own managed hosting service which I think is pretty reasonable value for money.
Along the way I did look into what it would take to host Ghost myself and understand how all its dependencies plug together. Even though I decided to go for the managed hosting option, being able to have a local instance of Ghost I can test integrations with will be incredibly useful - sounds like a job for Aspire!
Setting up the repository
Generally speaking, every time I get started on a new Aspire-based codebase I create a new repository based on our aspire-devcontainer template. I do this because I like working in devcontainers to keep all my potentially messy dependencies from spilling over between codebases.
To create a new repository based on this template click here and point to your org/user and name the repository.

Once you have the repository created and you have cloned it down to your local dev machine, you can open it up in Visual Studio Code and it will detect the devcontainer.json file and prompt you to open the codebase in a container.
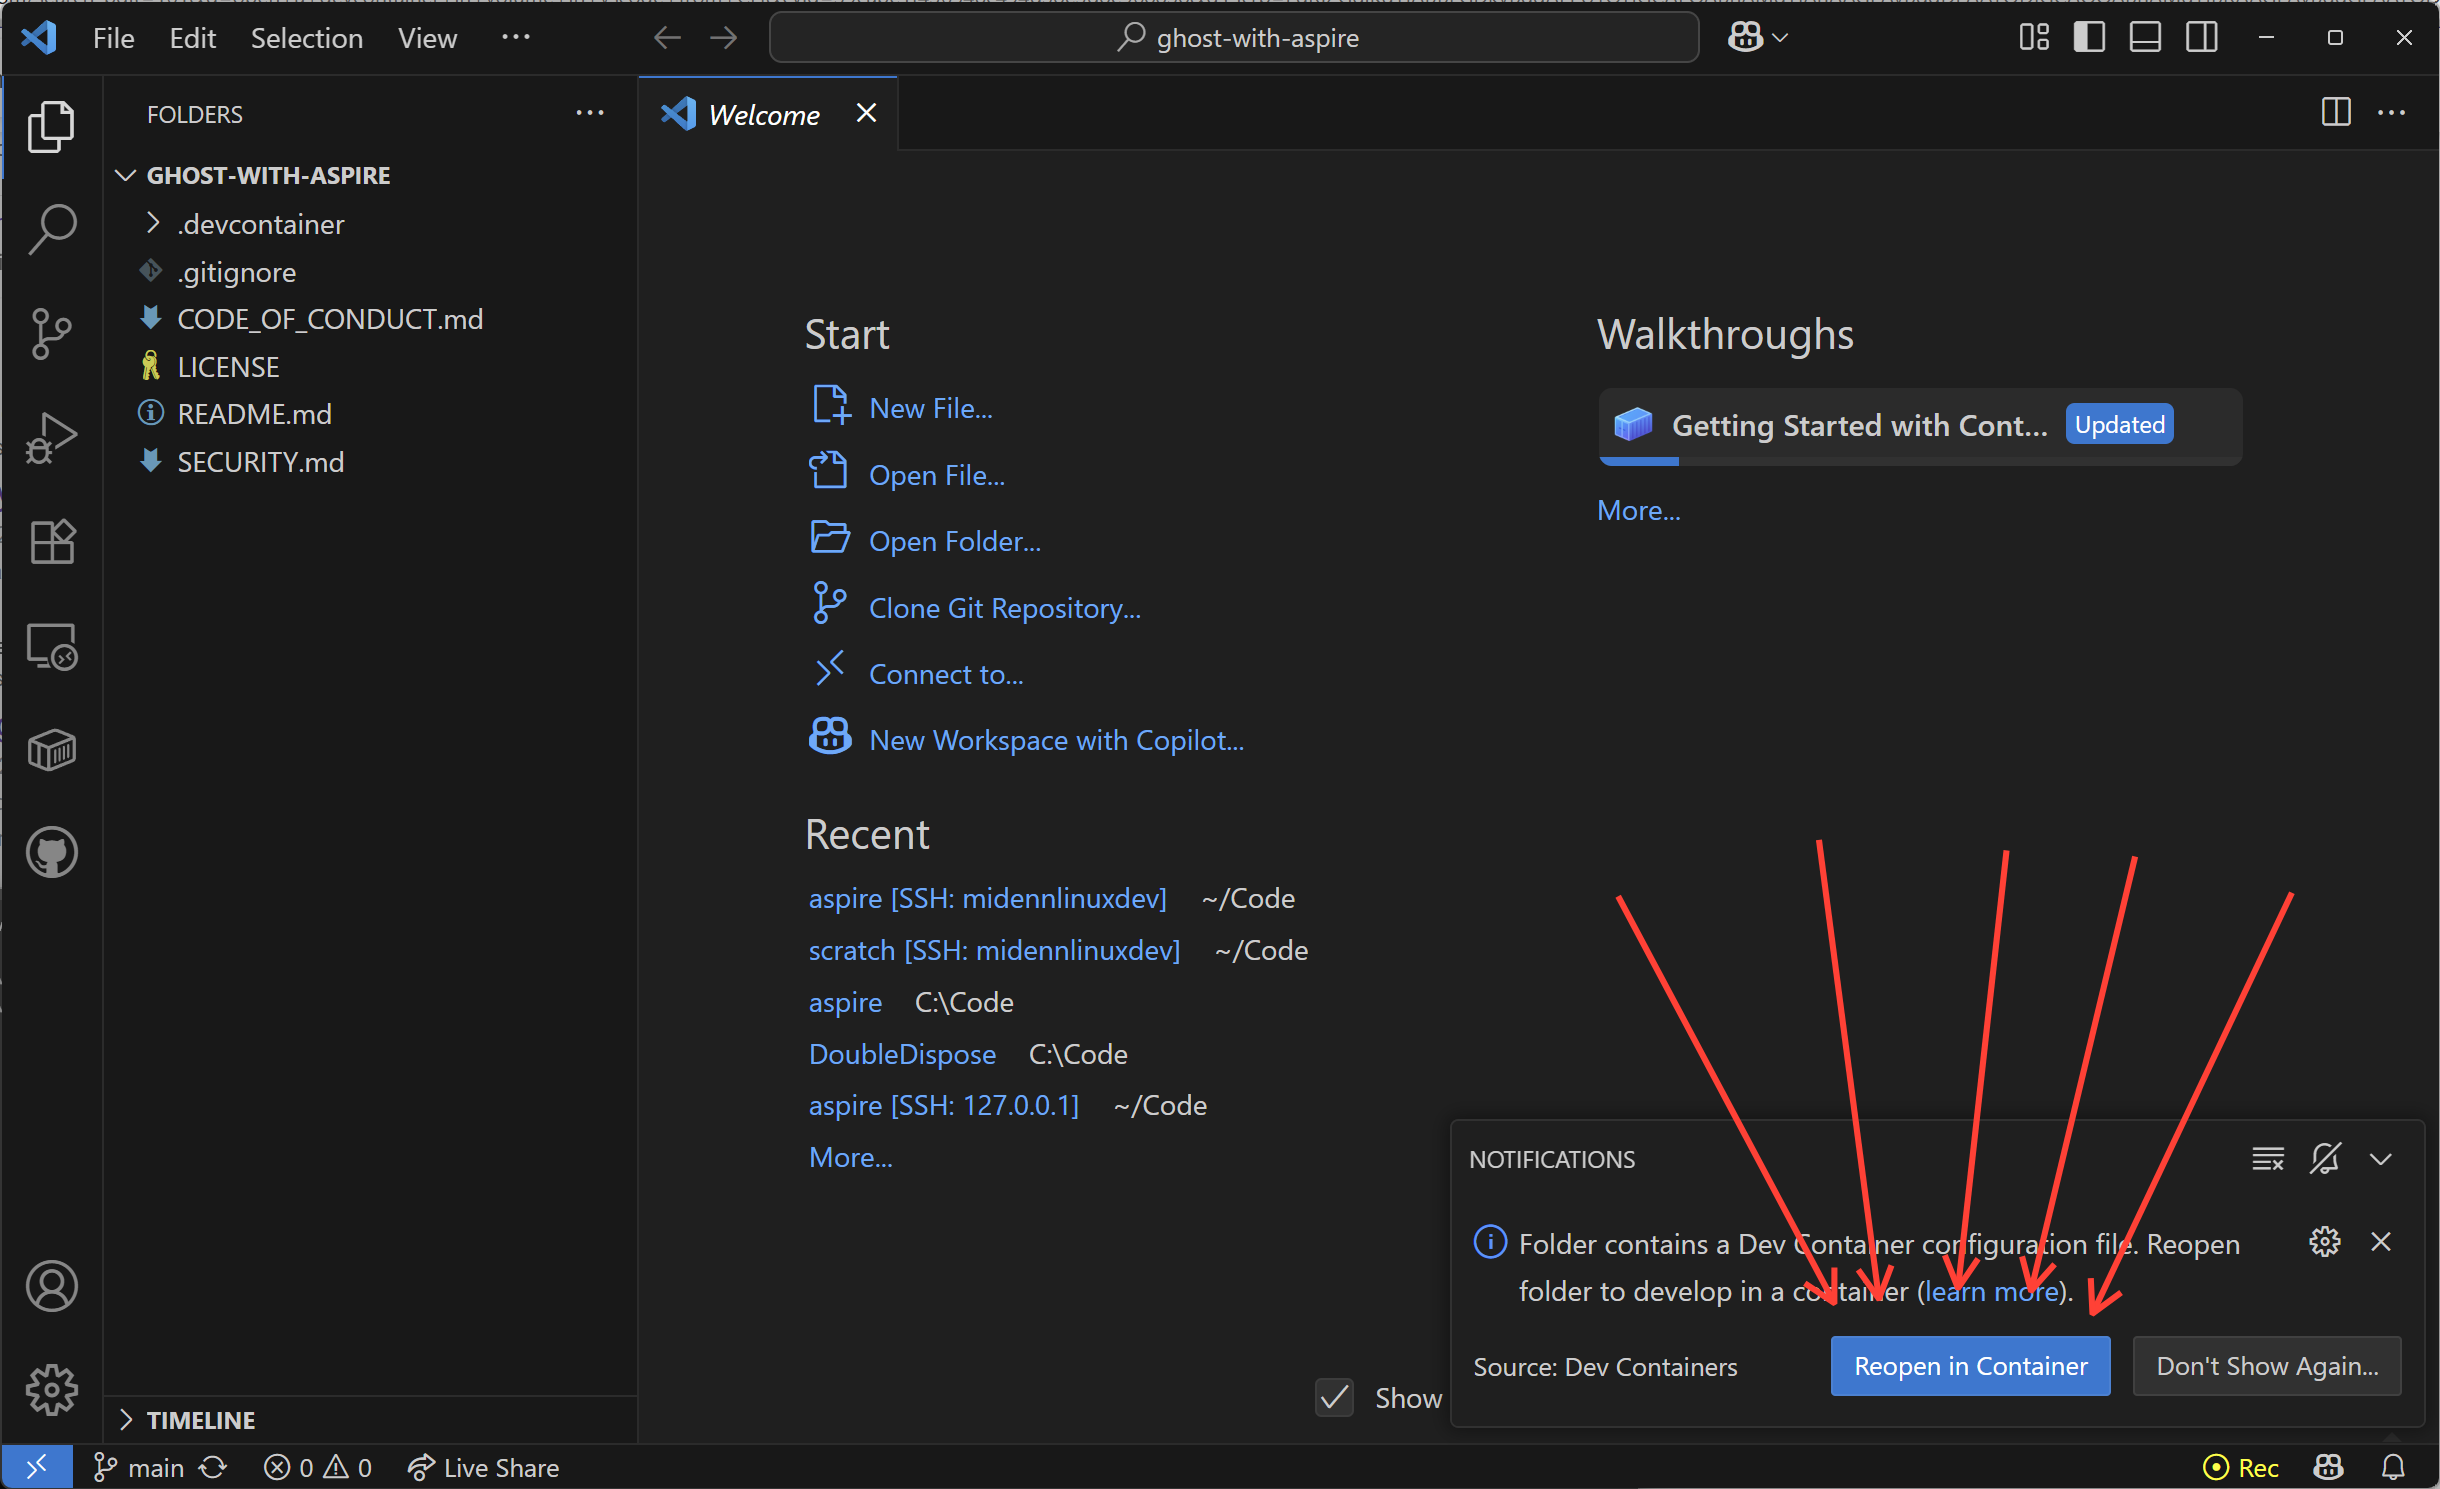
The first time you open it will take a little time because it needs to build a container image from scratch. Once the container build is complete open a terminal window (CTRL+SHIFT+`).
I'm a bit of a raving fan of devcontainers, GitHub Codespaces, and remote development features in VSCode in general so I tend to use them for everything. If that isn't your jam you can just install the Aspire CLI using our instructions ✌️
Once you have your terminal open run the aspire new command. The aspire CLI is pre-configured in the devcontainer, or you can install it on your local machine using the link from the section above.
$ aspire new
Select a project template:

  Starter template
> AppHost and service defaults
  AppHost
  Service defaults
  Integration tests
Selecting the "AppHost and service defaults" template when running aspire new command.
From this menu you want to use AppHost and service defaults because we are going to create an empty apphost, but we may still want the service defaults project down the track (for now you don't need to know what that is).
Give the project a name and an output path (choose your own or use mine to follow along exactly):
$ aspire new
Enter the project name (ghost-with-aspire): GhostWithAspire
Enter the output path: (./GhostWithAspire): src
Select a template version:

> 9.4.0 (nuget.org)

(Type to search)
Specifying project name, output path, and template version when running aspire new command.
Use the latest released version of Aspire for this, at the time of publishing that was 9.4.0. If you chose the same settings as I did there will now be a src folder with a GhostWithAspire.AppHost and GhostWithAspire.ServiceDefaults folder underneath it.
Just to make sure everything is working, we can now just run the Aspire application using the aspire run command. You should see some output that looks like this.
$ aspire run
🔍  Finding app hosts...
src/GhostWithAspire.AppHost/GhostWithAspire.AppHost.csproj

🗄  Created settings file at '.aspire/settings.json'.

   Dashboard:  https://localhost:17130/login?t=7ed21457b7e21e27907b7e83342d5ad4

        Logs:  /home/vscode/.aspire/cli/logs/apphost-4318-2025-08-04-06-37-50.log

               Press CTRL+C to stop the apphost and exit.
Aspire app-host running via the Aspire CLI showing links to dashboard and logs.
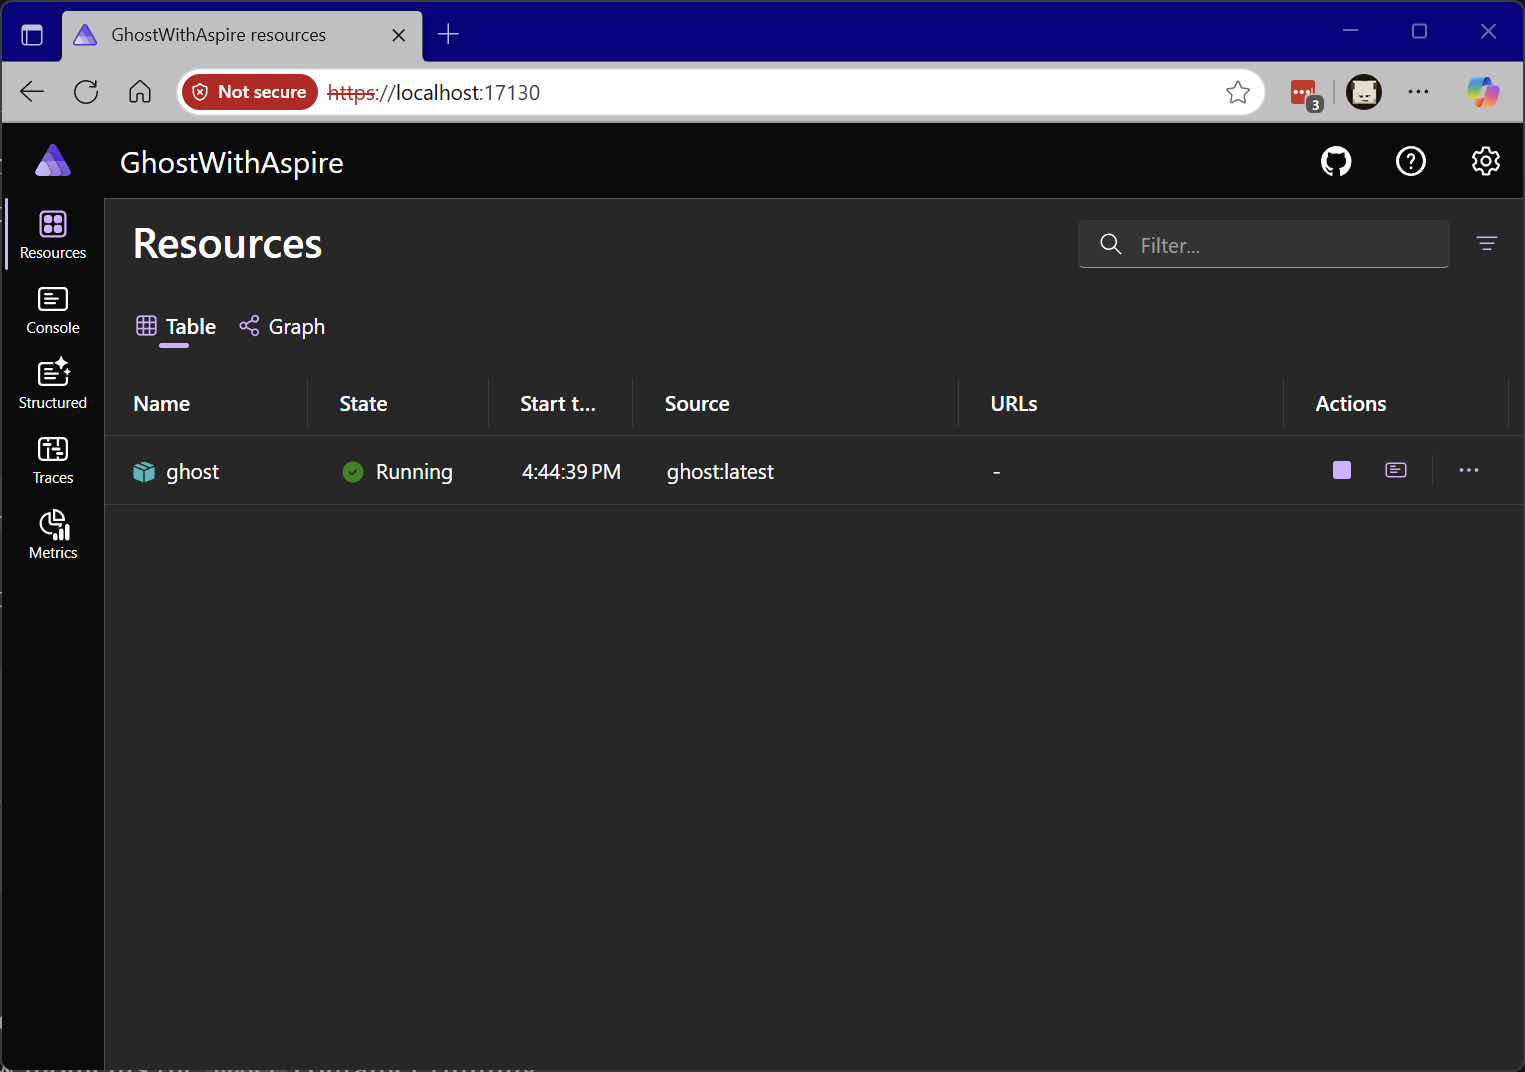
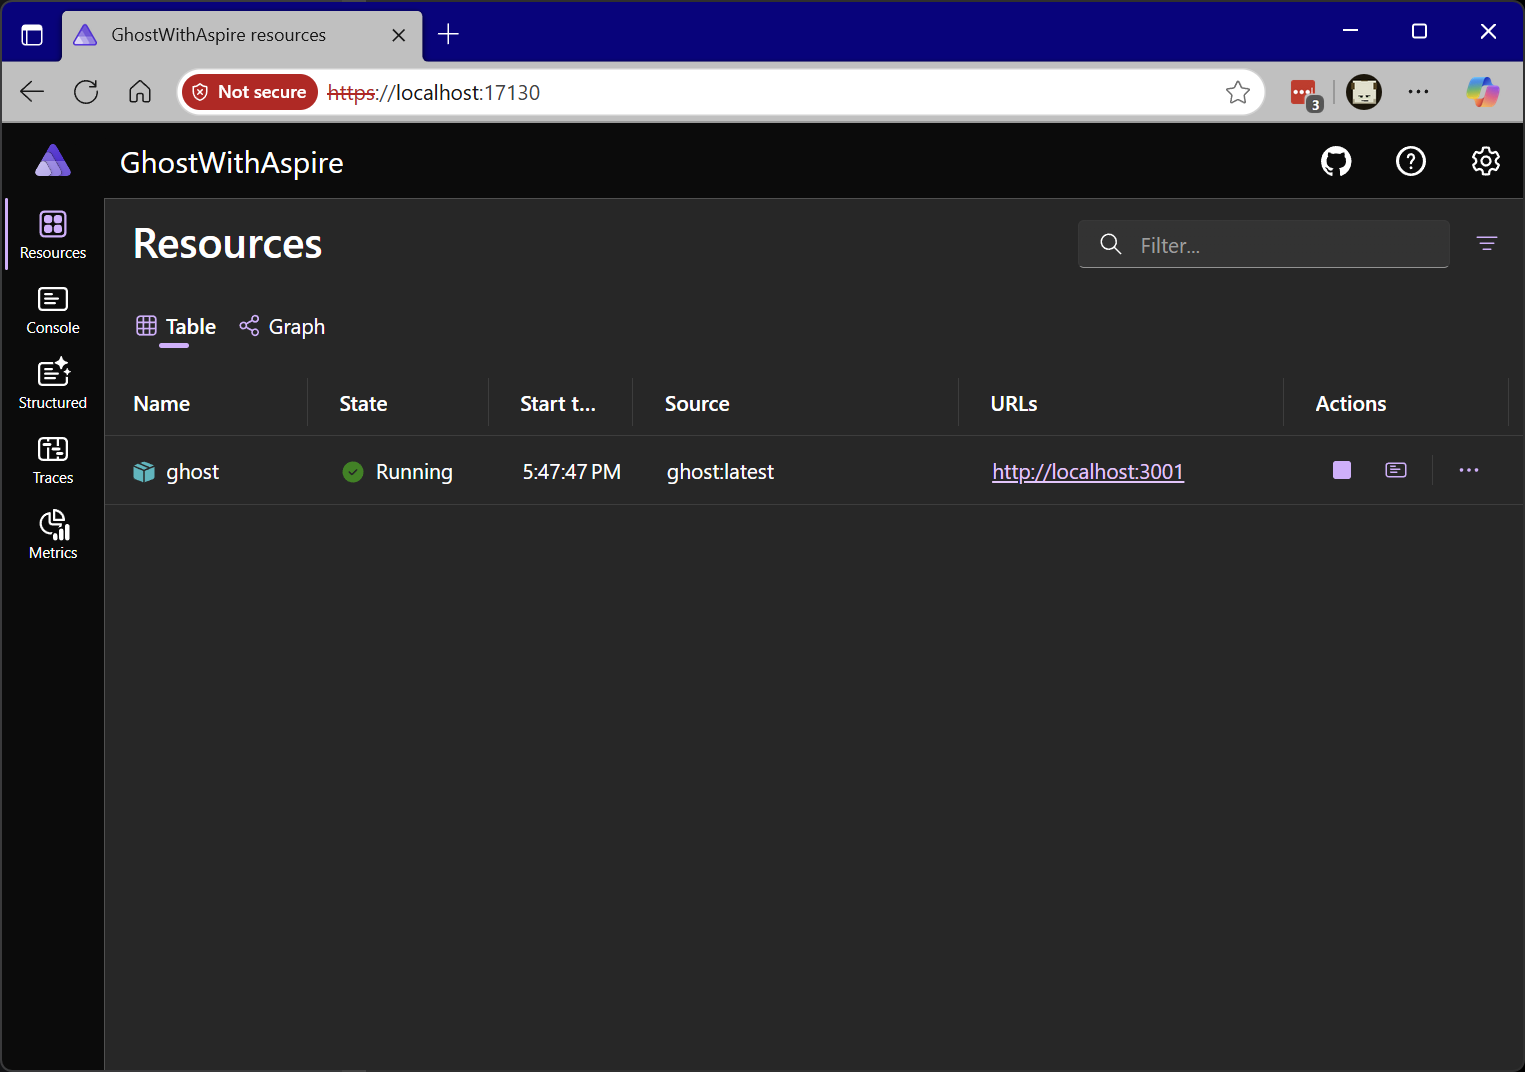
If you see this then it means that Aspire is correctly configured in the app-host is running. You can click on the Dashboard link and you should see the dashboard (although there will be nothing in it).

If you are using the devcontainer approach you will see a certificate warning when you first go to access the dashboard, just bypass this warning. This is because Aspire generated a self-signed certificate inside the devcontainer, but your local machine does not know about this certificate - if you were using the Aspire CLI on your local dev machine you would not see this warning.
Starting simple with Ghost
Ghost itself is effectively a Node.js application and the team has produced an NPM package which you can download that provides a CLI experience for installing and configuring Node.js.
That is probably a good option if you are installing on a server that you managed somewhere, but with Aspire to spin up and orchestrate and manage our processes and containers. Fortunately for us, Ghost also has an official Docker container which you can use.
Using the Docker CLI, the most minimal invocation that you can do to spin up a Docker instance locally is as follows:
docker run -d --name some-ghost -e NODE_ENV=development ghostDocker command to launch Ghost from the command-line.
The most literal translation of this into code in the Aspire app-host would be:
var builder = DistributedApplication.CreateBuilder(args);

builder.AddContainer("ghost", "ghost")
    .WithEnvironment("NODE_ENV", "development");

builder.Build().Run();
Starting the Ghost container via Aspire
If you restarted executed the aspire run command again and refreshed the Aspire dashboard page, you would see after a few moments the ghost container running.
Unfortunately, in this state it isn't possible to access the Ghost site because we haven't exposed any endpoints, so that is the next thing that we need to do. If we update the AppHost.cs code to the following it should do the trick:
var builder = DistributedApplication.CreateBuilder(args);

builder.AddContainer("ghost", "ghost")
    .WithEnvironment("NODE_ENV", "development")
    .WithHttpEndpoint(targetPort: 2368);

builder.Build().Run();
Map a HTTP endpoint into the Ghost container.
The WithHttpEndpoint(...) call adds a HTTP endpoint to the resource in the app-model. The targetPort argument specifies the port inside the container that code is listening on. By default, Aspire will assign a random port each time the app-host runs for the host bound port. If this isn't desirable, you can also specify the host port by specifying the the port argument.
var builder = DistributedApplication.CreateBuilder(args);

builder.AddContainer("ghost", "ghost")
    .WithEnvironment("NODE_ENV", "development")
    .WithHttpEndpoint(port: 3001, targetPort: 2368);

builder.Build().Run();
Map a HTTP endpoint with a stable host port.
Launching the app-host with aspire run once again will result in the Ghost container being spun up once again and it will be accessible (based on the code above) on http://localhost:3001.
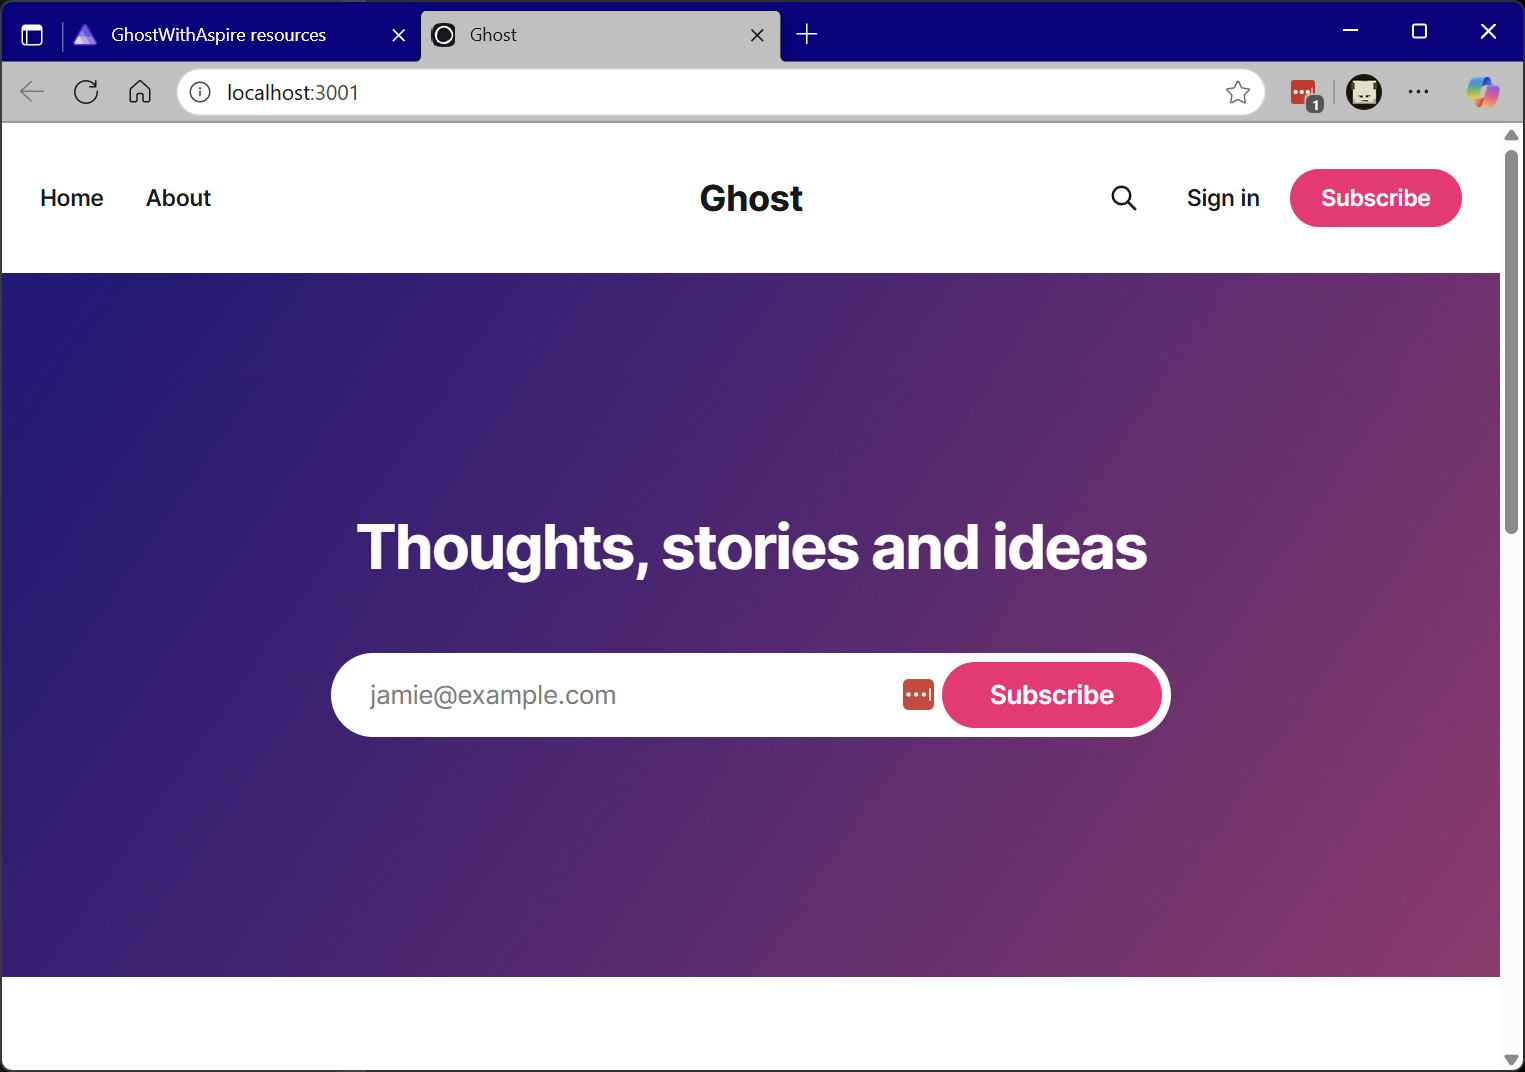
If you click on the localhost hyperlink in the Aspire Dashboard you'll be taken the the familiar Ghost landing page.
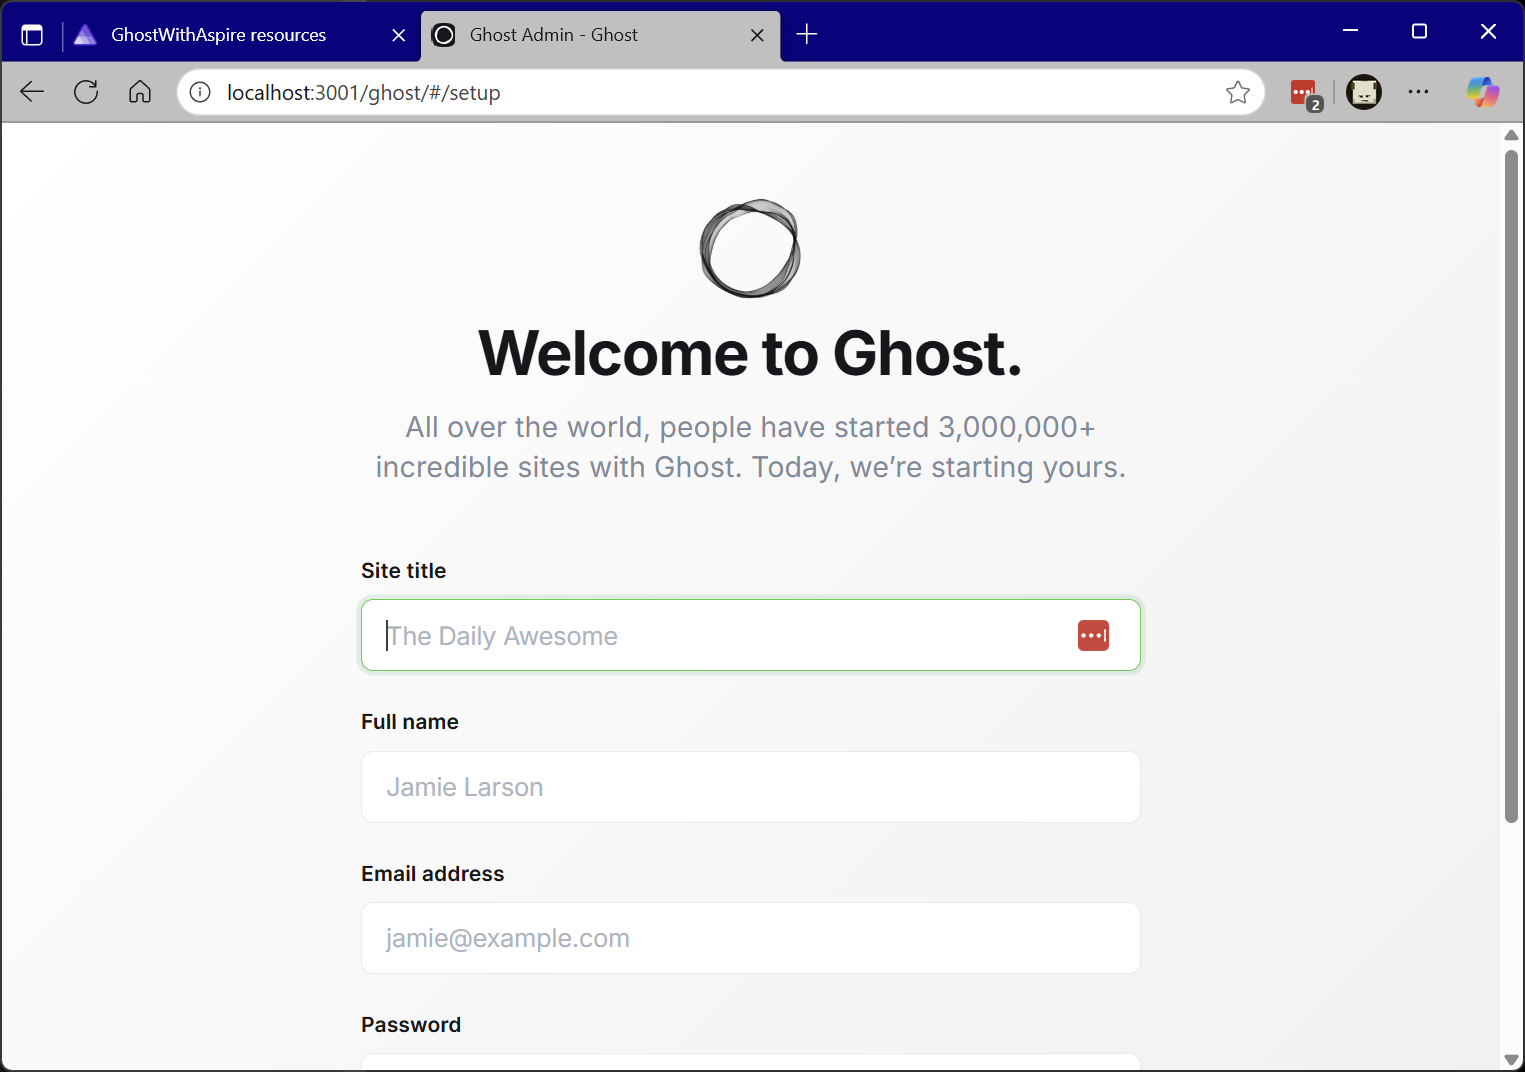
The admin page is also accessible (/ghost) and you can go through the process of setting up the site.
It's looking good so far, but there are a few issues:
- Every time we restart the Aspire app-host we have to reconfigure the Ghost site from scratch.
- The Sign-in and Subscribe buttons don't actually work.
Let's tackle these one at a time to understand what is going on.
Container persistence
By default, container resources shutdown when the Aspire app-host shuts down, and no container volumes or bind mounts to persist data are configured. Let's address both of those issues.
var builder = DistributedApplication.CreateBuilder(args);

builder.AddContainer("ghost", "ghost")
    .WithEnvironment("NODE_ENV", "development")
    .WithHttpEndpoint(port: 3001, targetPort: 2368)
    .WithLifetime(ContainerLifetime.Persistent) // Tells Aspire keep container alive
    .WithVolume("ghost-data", "/var/lib/ghost"); // Configures container volume

builder.Build().Run();
AppHost.cs with persistent lifetime and container volume.
When the Aspire app-host is launched again via aspire run the dashboard will show the Ghost resource, but this time there will be a pin against it:
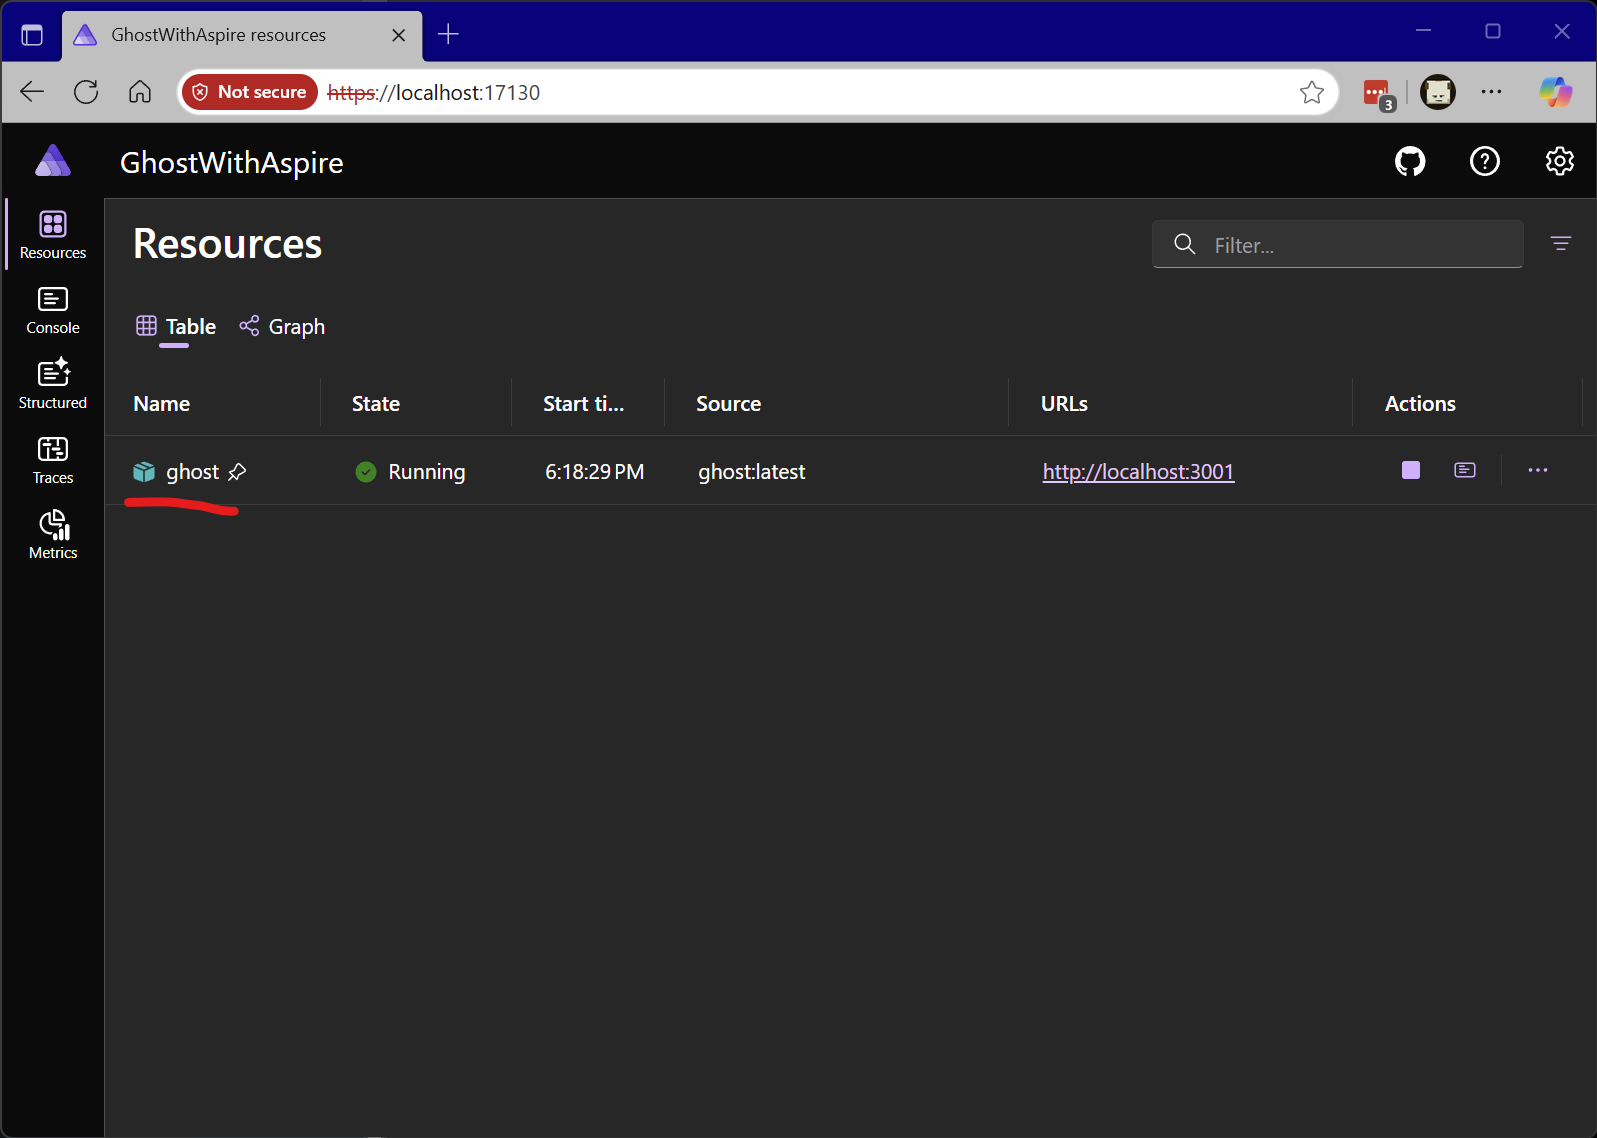
This means that even if you shut down the app-host the Ghost container will continue running behind the scenes in your container runtime (either Docker or Podman).
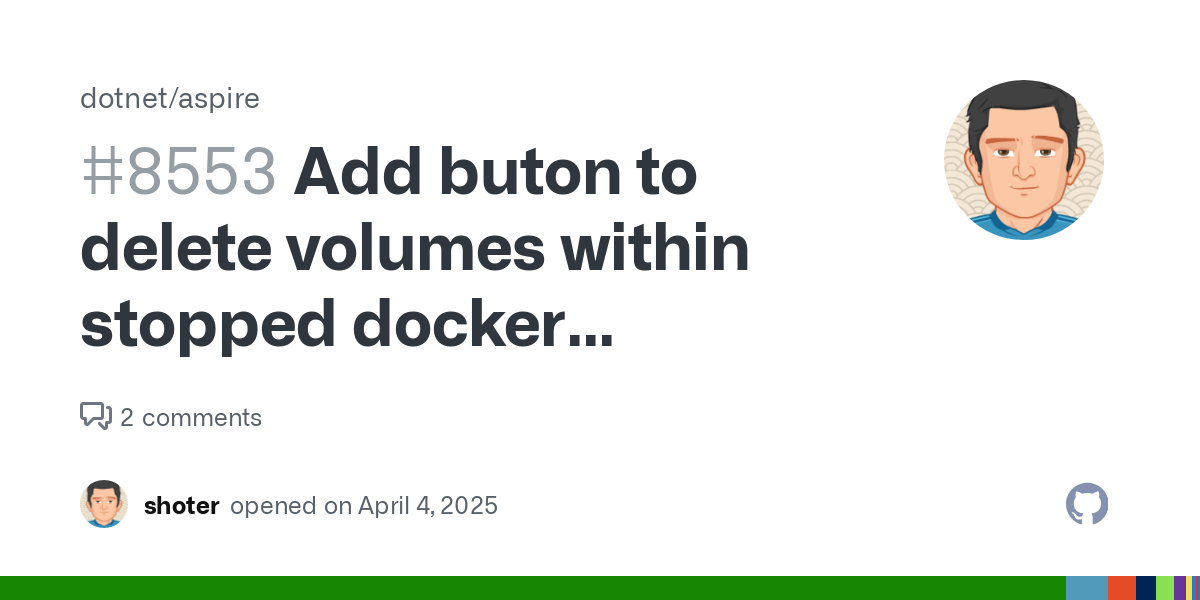
If you want to shut down the container you can just the stop icon under the Actions column in the dashboard, or you can use the docker or podman command-lines. You can also use the docker or podman command-lines to delete the container volume if you want to start fresh.
One Aspire user has actually put in a feature request to make it easier to delete volumes from within the Aspire Dashboard directly which is something we are considering.
💡Remember the password that you use to create the site when you have persistence configured otherwise, you'll have to reset everything!
Making sign-in and subscribe work
Now let's look at why the sign-in and subscribe links are not working. If I open the developer console in the browser after interacting with these buttons, I can see that the browser is failing to connect to the backend server.
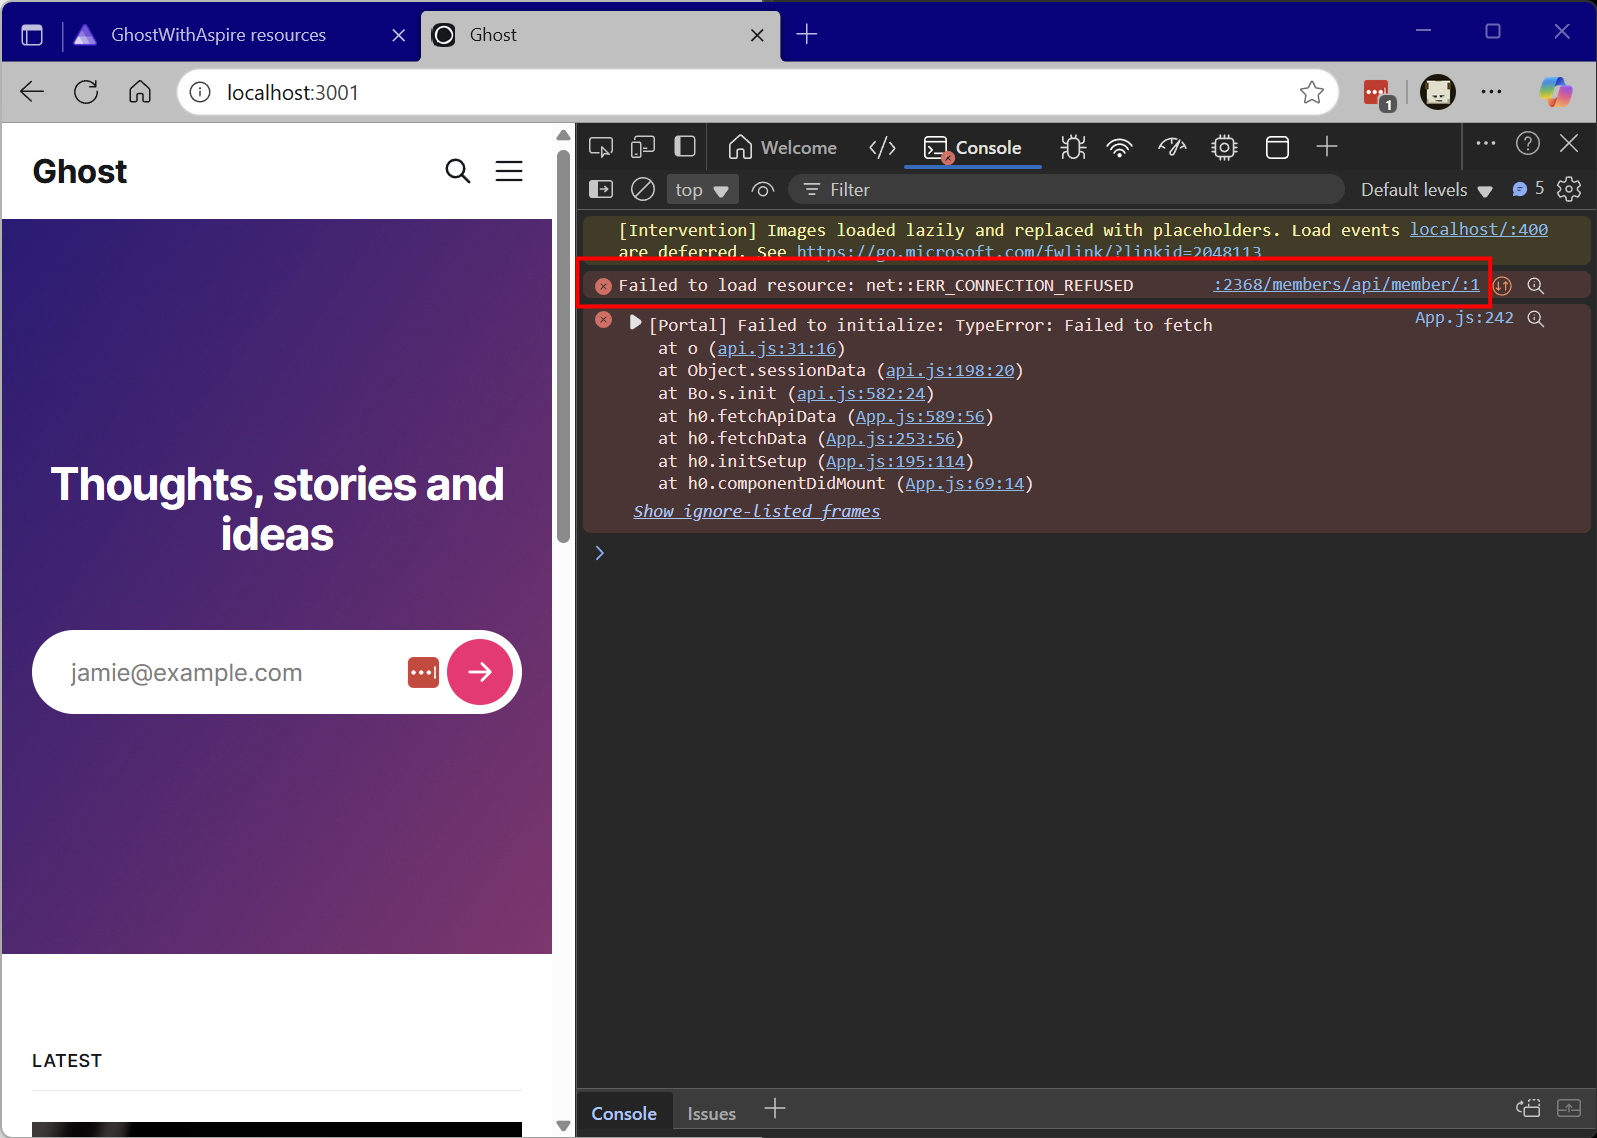
In this case the client-side code believes that the backend server is listening on port 2368. This is actually something that I see fairly frequently with CMS platforms where the CMS itself needs to know explicitly what URL it is being exposed on over the Internet to customize some of the REST API calls that it needs to make. In the case of Ghost there is a url environment variable that needs to be set that will tell it what port it is exposed on.
Mapping endpoint information to environment variables is one of the areas where we start to see some of the power, but also some of the nuance of working with Aspire. I could modify the code to look like this:
var builder = DistributedApplication.CreateBuilder(args);

builder.AddContainer("ghost", "ghost")
    .WithEnvironment("NODE_ENV", "development")
    .WithHttpEndpoint(port: 3001, targetPort: 2368)
    .WithLifetime(ContainerLifetime.Persistent)
    .WithVolume("ghost-data", "/var/lib/ghost")
    .WithEnvironment("url", "http://localhost:3001"); // Tells backend what it exposed as.

builder.Build().Run();
Code setting hardcoded url environment variable to http://localhost:3000.
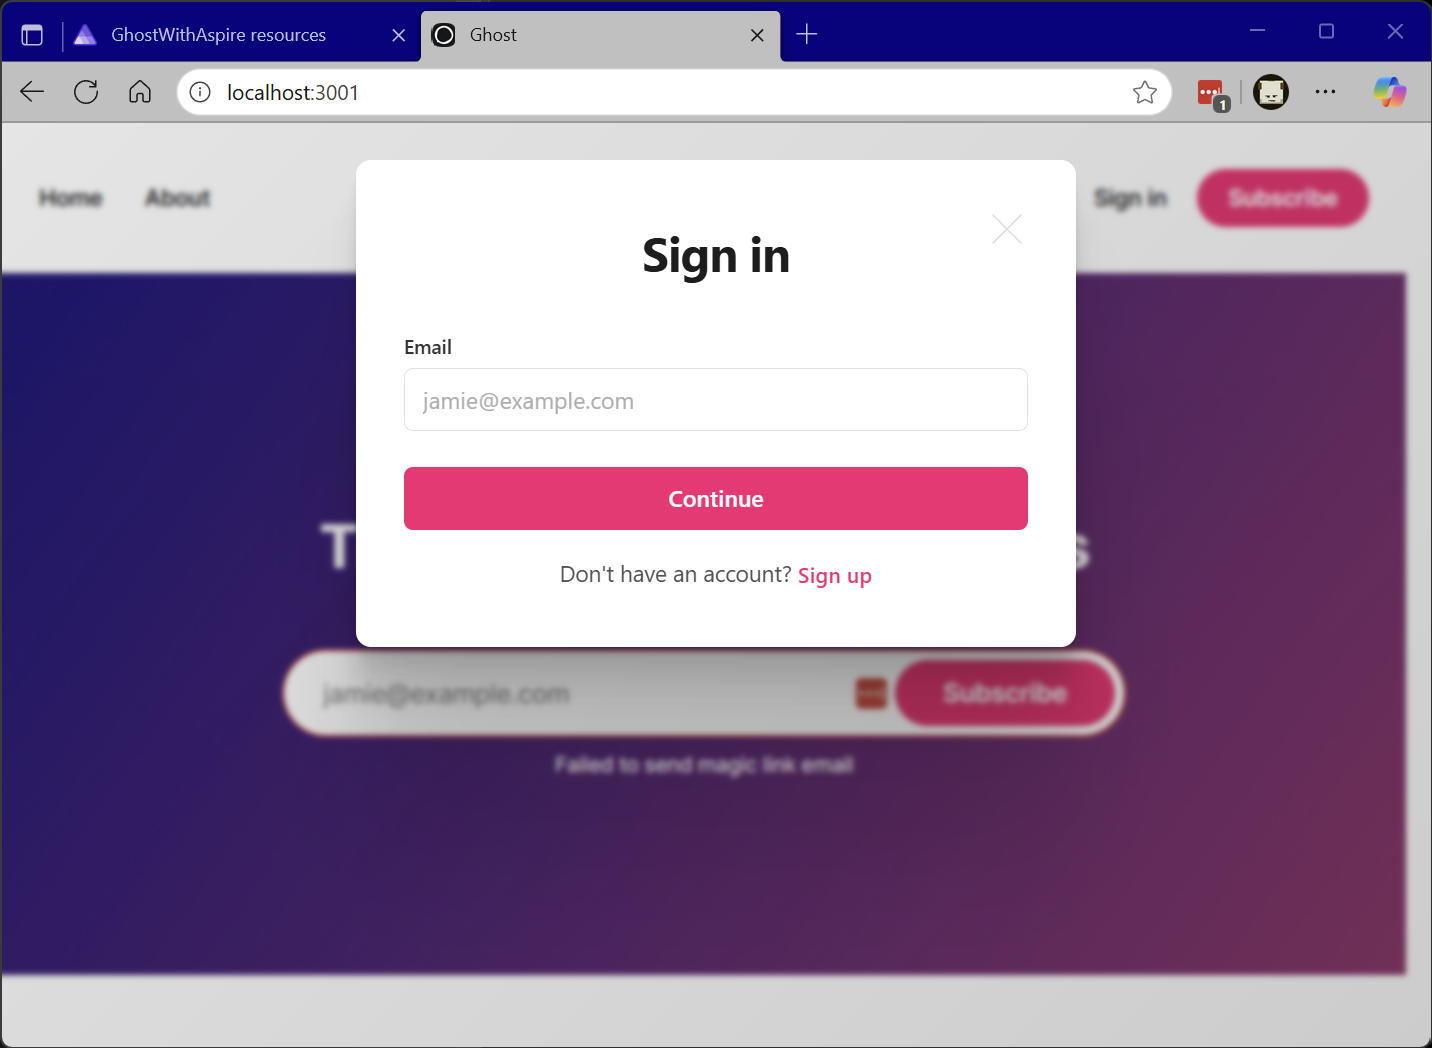
... and this work. If I click on sign-in, the member API is available, and I get the sign-in prompt.
In most scenarios this would be fine, and you could move on however it is a good opportunity to point out the ability of Aspire to dynamically inject values. We can change the above code to the following:
var builder = DistributedApplication.CreateBuilder(args);

var ghost = builder.AddContainer("ghost", "ghost")
    .WithEnvironment("NODE_ENV", "development")
    .WithHttpEndpoint(port: 3001, targetPort: 2368);
    .WithLifetime(ContainerLifetime.Persistent)
    .WithVolume("ghost-data", "/var/lib/ghost");

ghost.WithEnvironment((context) => {
    context.EnvironmentVariables.Add("url", $"{ghost.GetEndpoint("http").Url}");
    });

builder.Build().Run();
Set the url environment variable using a deferred callback to an automatically generated value.
This code is more verbose to be sure, but the effect is that the url environment variable now "follows" whatever the value of port is specified in the WithHttpEndpoint(...) call. In the code above we captured the result of the AddContainer(...) call in a ghost variable and then we used that variable in a callback we registered against itself in the final WithEnvironment(...) call.
We could now remove the port parameter on the WithHttpEndpoint(...) call completely and the port would randomly change each time the Aspire app-host launched and a different url value would be passed in each time.
Almost there! It turns out that whilst we've got the port issues sorted out, Ghost actually has a dependency on a functioning mail relay in order to allow users to subscribe to the site.
We have a few options here:
- Allow mail relay settings to be captured as configuration parameters which can be specified by developers when they launch the app-host.
- Run a dev-mode mail server to test end-to-end experience without risking accidentally sending e-mails to people.
For dev-time, option two is probably the best choice and we'll explore that in detail below, but I wanted to briefly touch on option 1 because it allows me to show off a pretty cool feature that we shipped in Aspire 9.4.
Using parameters to capture configuration values
For production configurations the Ghost team recommends using Mailgun for transactional and bulk e-mail. But for local e-mail only a mail server for transactional e-mail needs to be configured and any SMTP relay will work.
In my experience network and/or system administrators aren't that enthused about giving out credentials to mail relays within corporate environments but in case you work in one of these developer utopias the following technique for configuring mail server settings might work for you whilst avoid putting those configuration values anywhere near files that you will commit to source control.
A parameter in Aspire is a resource which holds a single configuration string. They are added to the app-model in the AppHost.cs just like any other resource. Here is a simple example:
var builder = DistributedApplication.CreateBuilder(args);

// Configuration parameters in app-model for SMTP server.
var mailOptionsHost = builder.AddParameter("mailOptionsHost");
var mailOptionsPort = builder.AddParameter("mailOptionsPort");

var ghost = builder.AddContainer("ghost", "ghost")
    .WithEnvironment("NODE_ENV", "development")
    .WithHttpEndpoint(targetPort: 2368)
    .WithLifetime(ContainerLifetime.Persistent)
    .WithVolume("ghost-data", "/var/lib/ghost")
    .WithEnvironment("mail__from", "postmaster@mycompany.com")
    .WithEnvironment("mail__options__host", mailOptionsHost)
    .WithEnvironment("mail__options__port", mailOptionsPort);

ghost.WithEnvironment((context) => {
    context.EnvironmentVariables.Add("url", $"{ghost.GetEndpoint("http").Url}");
    });

builder.Build().Run();
Defining parameter values in the Aspire app-model.
When this app-host is launched using aspire run the dashboard will hold off launching resources that depend on parameters that have not had their value set and give the developer an opportunity to set them within the dashboard.
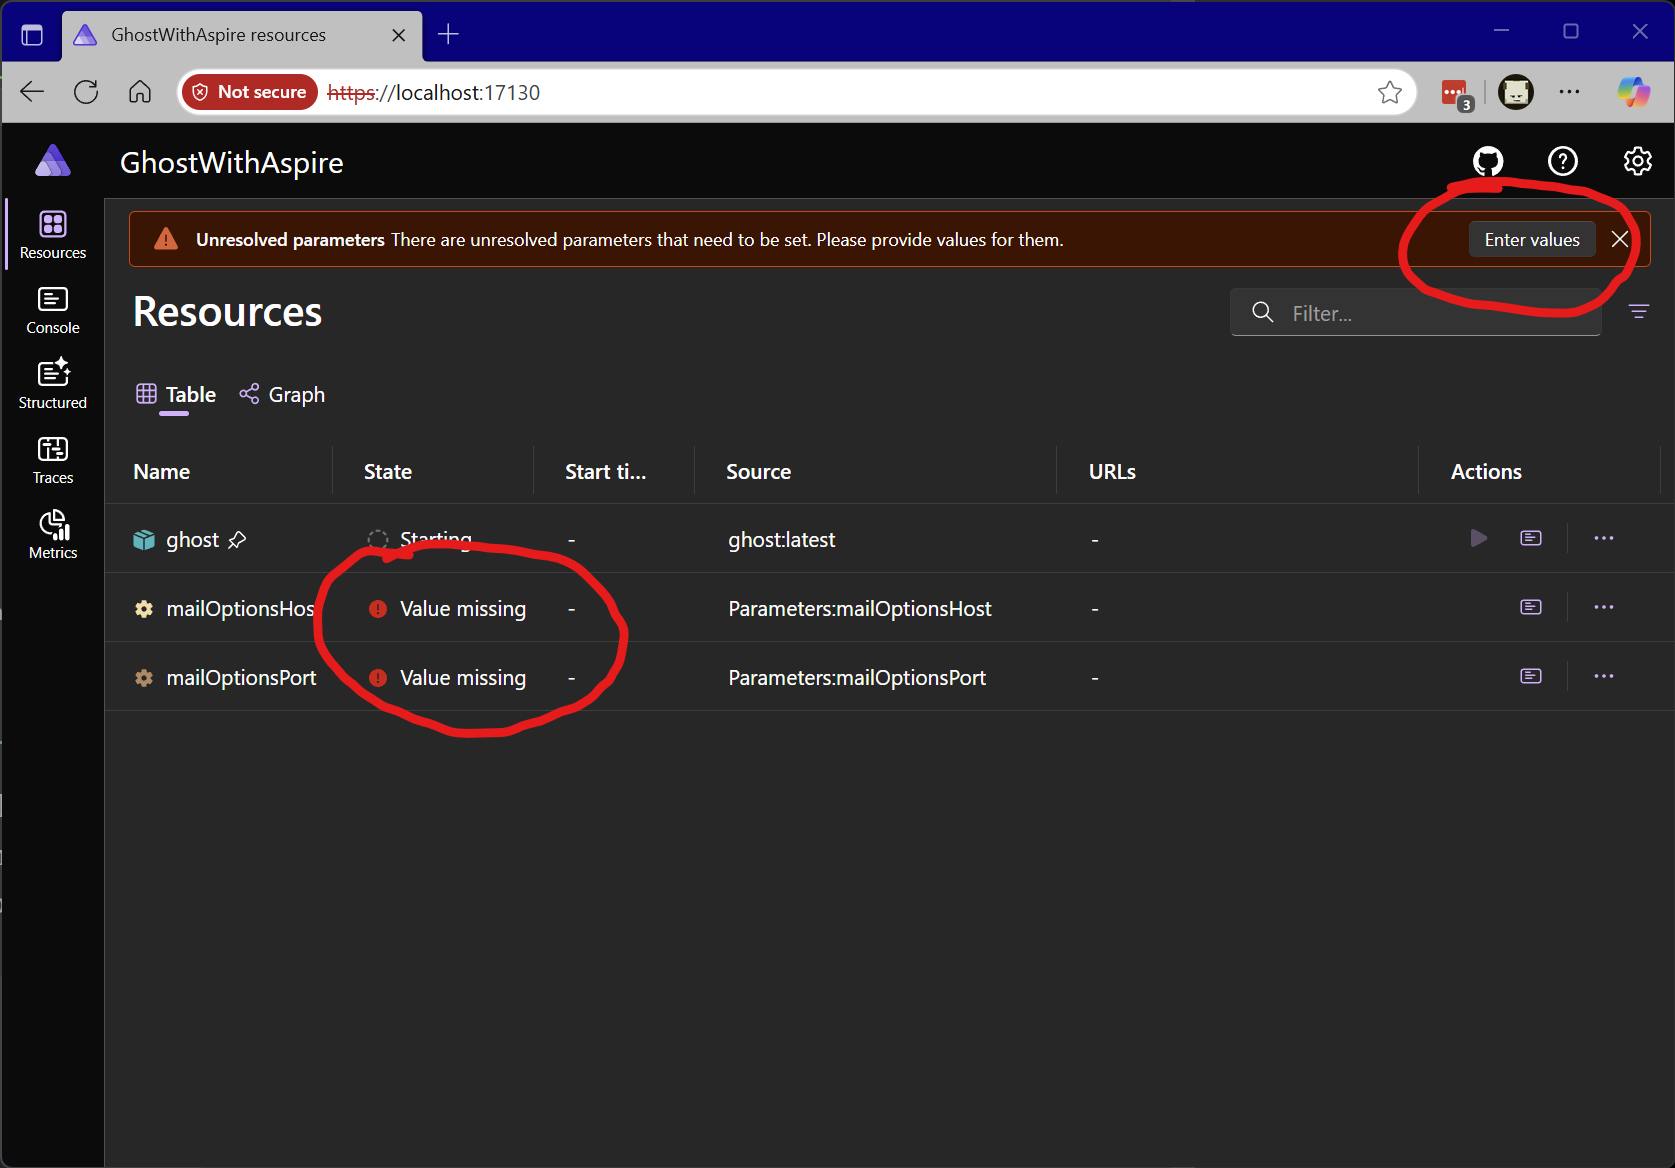
It is also possible to fine-tune the display of the prompts for parameter values add validation. Here is a more elaborate example which customizes the display label and constrains the input types for the values.
#pragma warning disable ASPIREINTERACTION001 // Type is for evaluation purposes only and is subject to change or removal in future updates. Suppress this diagnostic to proceed.

var builder = DistributedApplication.CreateBuilder(args);

var mailOptionsHost = builder.AddParameter("mailOptionsHost")
    .WithCustomInput((p) => new()
    {
        Label = "Mail server host",
        InputType = InputType.Text,
        Placeholder = "mail.mycompany.com"
    });

var mailOptionsPort = builder.AddParameter("mailOptionsPort")
    .WithCustomInput((p) => new()
    {
        Label = "Mail server host",
        InputType = InputType.Number,
        Placeholder = "465",
    });

var ghost = builder.AddContainer("ghost", "ghost")
    .WithEnvironment("NODE_ENV", "development")
    .WithEnvironment("mail__from", "postmaster@mycompany.com")
    .WithEnvironment("mail__options__host", mailOptionsHost)
    .WithEnvironment("mail__options__port", mailOptionsPort)
    .WithHttpEndpoint(targetPort: 2368);
    .WithLifetime(ContainerLifetime.Persistent)
    .WithVolume("ghost-data", "/var/lib/ghost");

// Dynamically set the URL
ghost.WithEnvironment((context) => {
    context.EnvironmentVariables.Add("url", $"{ghost.GetEndpoint("http").Url}");
    });

builder.Build().Run();
Using WithCustomInput(...) to fine-tune parameter inputs on the dashboard.
When displayed, the input fields in the dialog that is displayed when you click on Enter values reflects the configuration from the WithCustomInput(...) call.
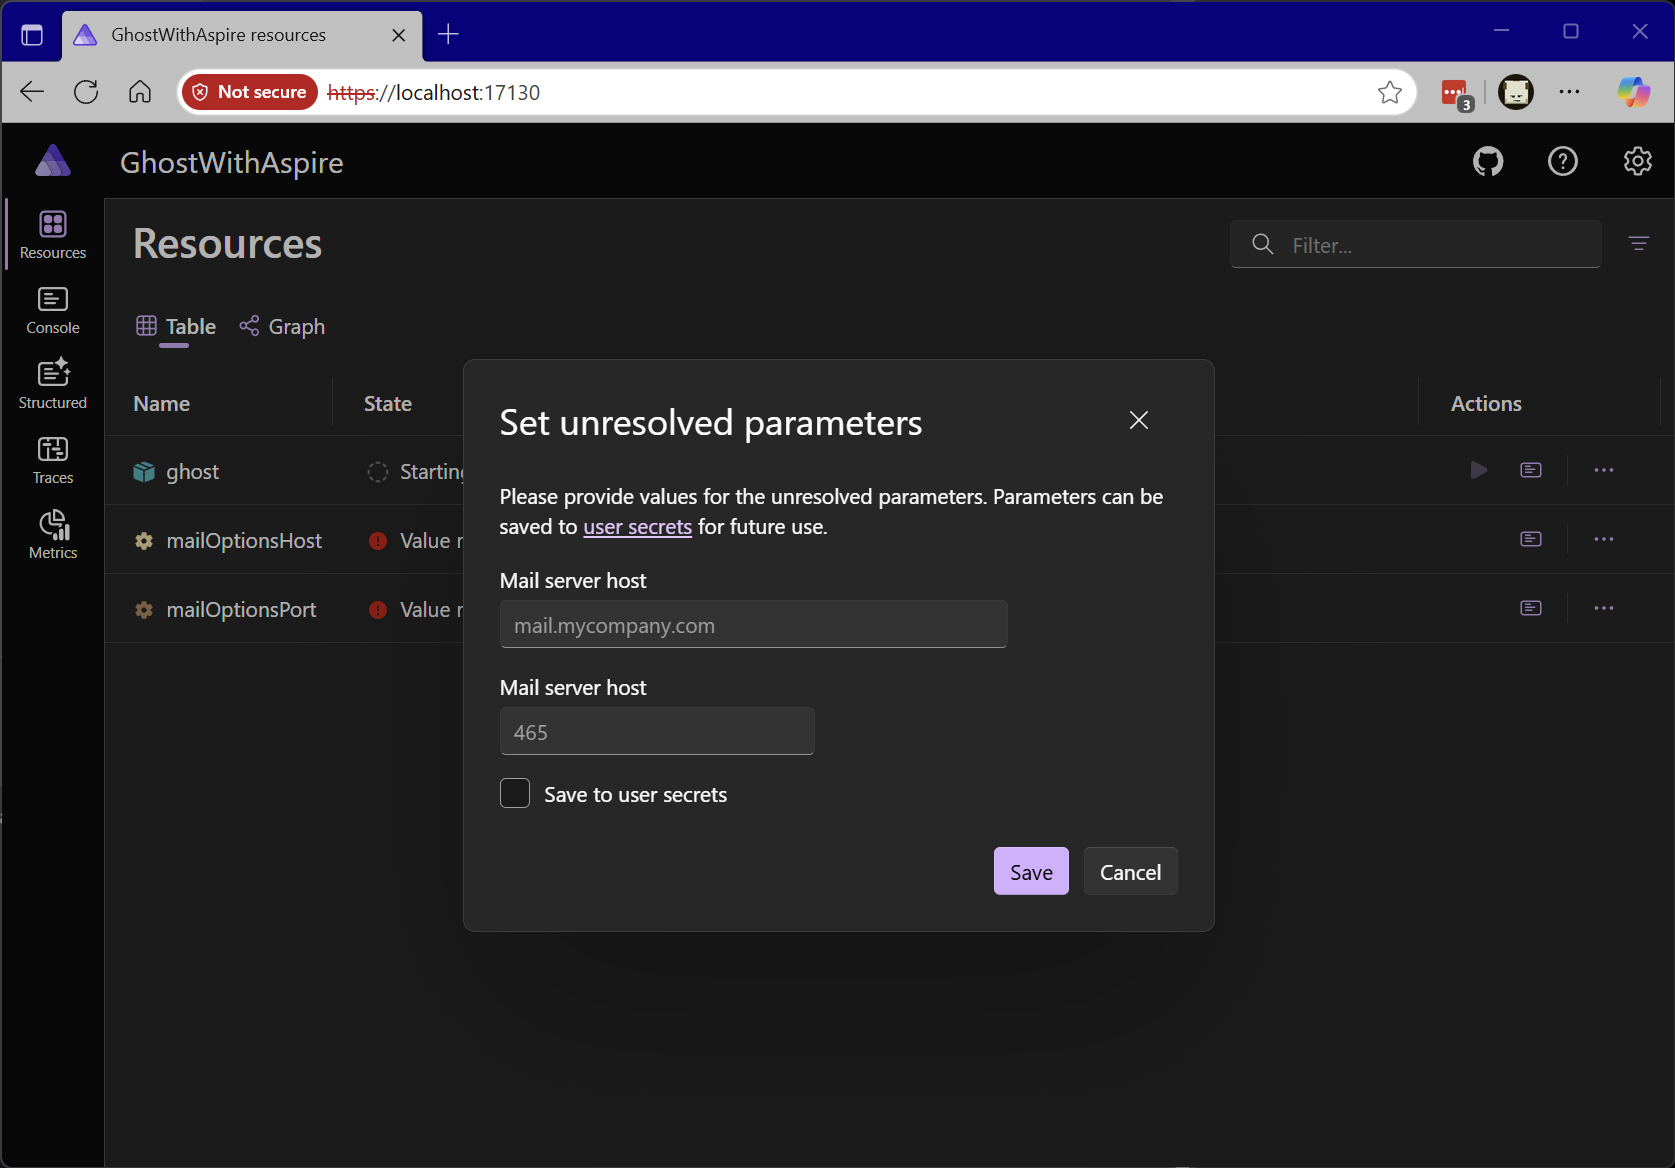
When the user clicks Save to user secrets the inputs that they provide will be stored in the user home directory in a well-known location, mapped to the app-host but isolated from the Git repository to avoid it being checked-in.
Avoiding the need for parameters for inner loop
While specifying configuration values via input parameters is sometimes unavoidable - for the developer inner loop we can actually do better and ensure that no e-mail ever escapes the development environment.
In addition to Aspire having a set of built-in primitives for you defining your own application components there are pre-built integrations for things like databases, messaging systems and other common dependencies. There is also a community toolkit which includes a much broader array of integrations - including a plug-and-play integration for Mailpit a local dev-time SMTP mail server with a built-in web UI for inspecting the contents of mail messages.
To make use of the the Mailpit integration invoke the following command on the terminal:
aspire add mailpitOnce installed you can update the code to add a mailpit resource to the app model.
var builder = DistributedApplication.CreateBuilder(args);

// Adds a MailPit resource to the app-model.
var mailpit = builder.AddMailPit("mailpit");

var ghost = builder.AddContainer("ghost", "ghost")
    .WithEnvironment("NODE_ENV", "development")
    .WithHttpEndpoint(targetPort: 2368)
    .WithEnvironment("mail__from", "postmaster@mycompany.com")
    .WithEnvironment("mail__transport", "SMTP")
    .WithLifetime(ContainerLifetime.Persistent)
    .WithVolume("ghost-data", "/var/lib/ghost");

ghost.WithEnvironment((context) =>
{
    context.EnvironmentVariables.Add("url", $"{ghost.GetEndpoint("http").Url}");
    context.EnvironmentVariables.Add("mail__options__host", mailpit.GetEndpoint("smtp").Host);
    context.EnvironmentVariables.Add("mail__options__port", mailpit.GetEndpoint("smtp").Port);
});

builder.Build().Run();
Code showing mailpit resource and injecting the mail pit host and port into the ghost resource environment.
If you try running this using aspire run and attempting to subscribe to the newsletter in the Ghost site, you'll see that an error occurs. If you go to the Aspire Dashboard and click on the logs icon and select the ghost resource, you'll see an error:
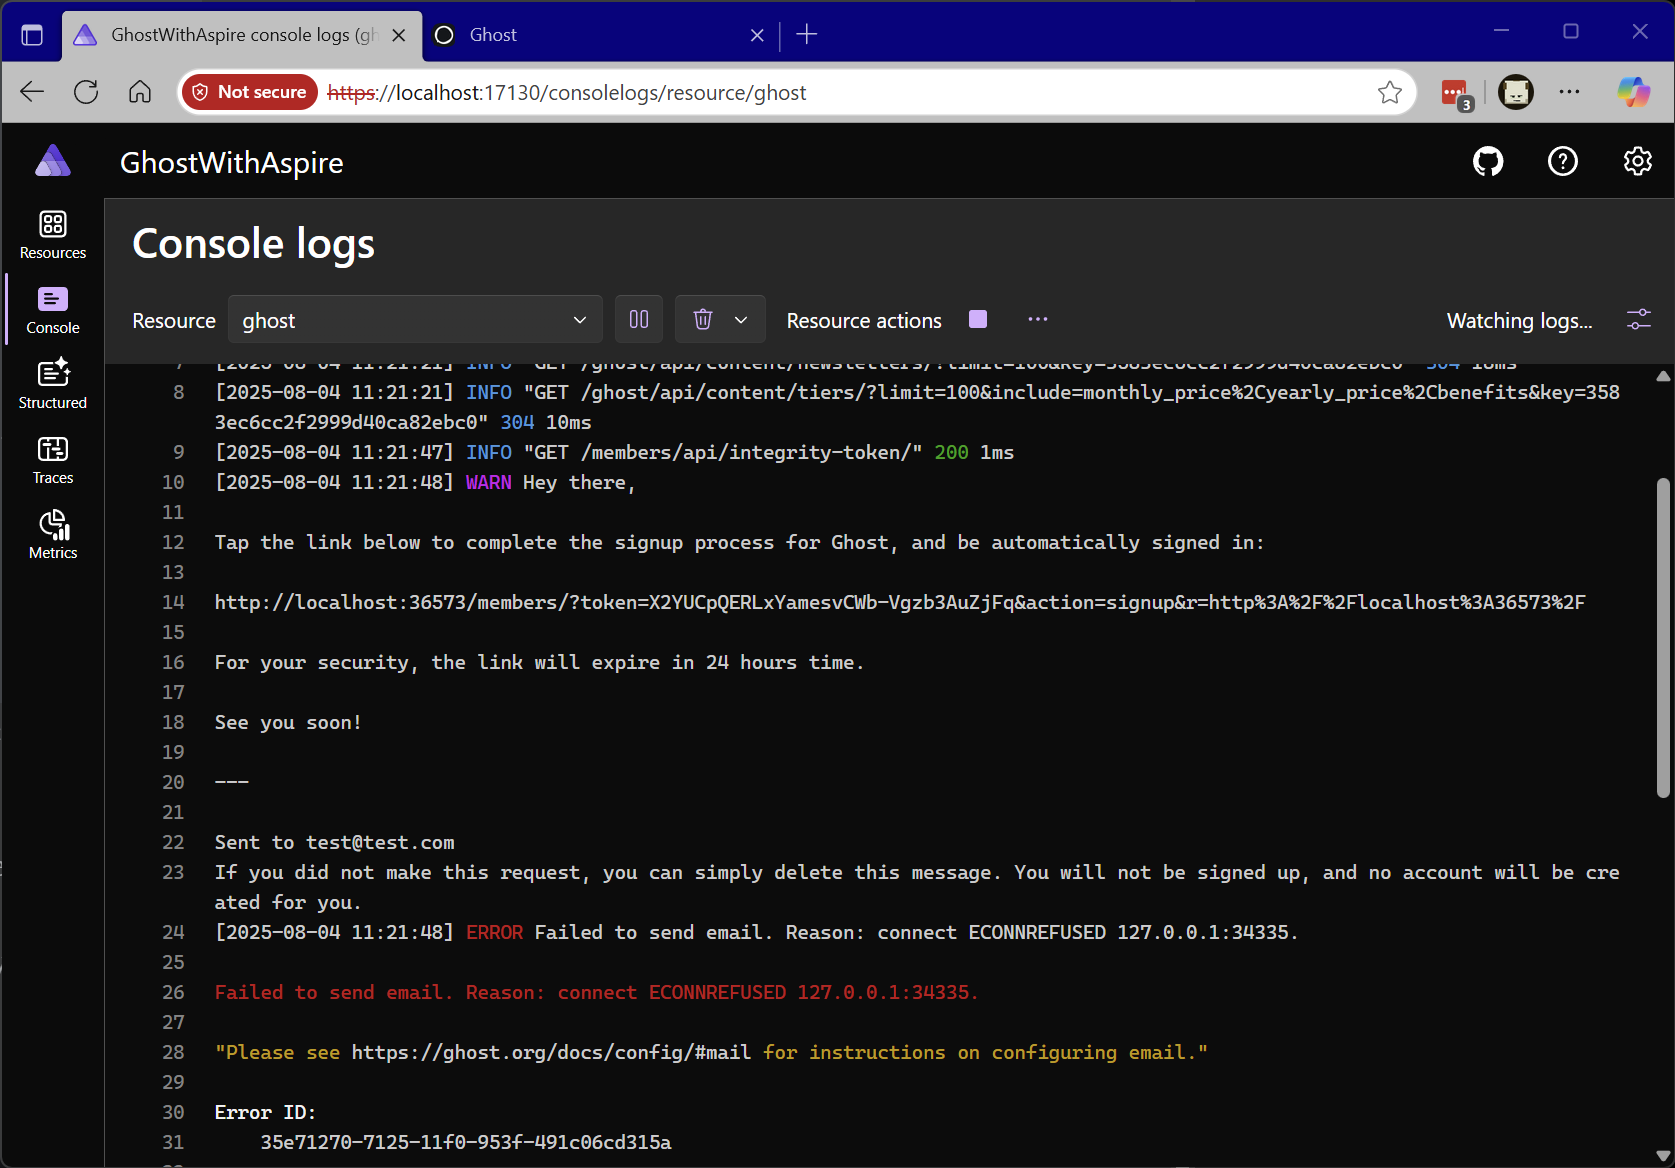
ghost container to port exposed on mailpit container.A container to host networking detour
The issue here is subtle and highlights an issue which sometimes comes up with orchestration tools when it comes to name resolution across networks. In the scenario we've been building up here we have been working across two containers running inside a container runtime. Aspire gives each container in the container runtime a DNS name based on the name of the resource.
However, Aspire doesn't just orchestrate containers, it can orchestrate local non-containerized processes and cloud-hosted services which is a slightly more complex topology than say just running everything in a single Docker network.
If we had a non-containerized process running as part of the Aspire app-host and wanted to connect to the mailpit resource the name, we would want it to be resolved as is localhost not mailpit. This would be so our TCP proxy could push the traffic across to the Docker network which in some environments involves a transition to a virtual machine (such as Windows and Mac).
However - for container-to-container communication we would want to use the DNS name assigned to the Docker resource (in this case mailpit).
For some endpoint properties (such as Url and HostAndPort we detect the context in which you are using them and automatically map to the container DNS name or localhost - however in the case of Host and Port we do not. This means that unfortunately in this case we need an alternative approach. The following works:
var builder = DistributedApplication.CreateBuilder(args);

var mailpit = builder.AddMailPit("mailpit");

var ghost = builder.AddContainer("ghost", "ghost")
    .WithEnvironment("NODE_ENV", "development")
    .WithHttpEndpoint(targetPort: 2368)
    .WithEnvironment("mail__from", "postmaster@mycompany.com")
    .WithEnvironment("mail__transport", "SMTP")
    .WithLifetime(ContainerLifetime.Persistent)
    .WithVolume("ghost-data", "/var/lib/ghost");

ghost.WithEnvironment((context) =>
{
    context.EnvironmentVariables.Add("url", ghost.GetEndpoint("http").Url);

    // HACK: Using the resource name since for container-to-container
    //       communication the DNS name for the resource in the Docker
    //       network should be the resource name.
    context.EnvironmentVariables.Add("mail__options__host", mailpit.Resource.Name);

    // HACK: Using TargetPort because for container-to-container
    //       communication we don't hairpin through the TCP proxy.
    context.EnvironmentVariables.Add("mail__options__port", mailpit.GetEndpoint("smtp").TargetPort!);
});

builder.Build().Run();
Code showing the hacks to resolve the container-to-container communication issues.
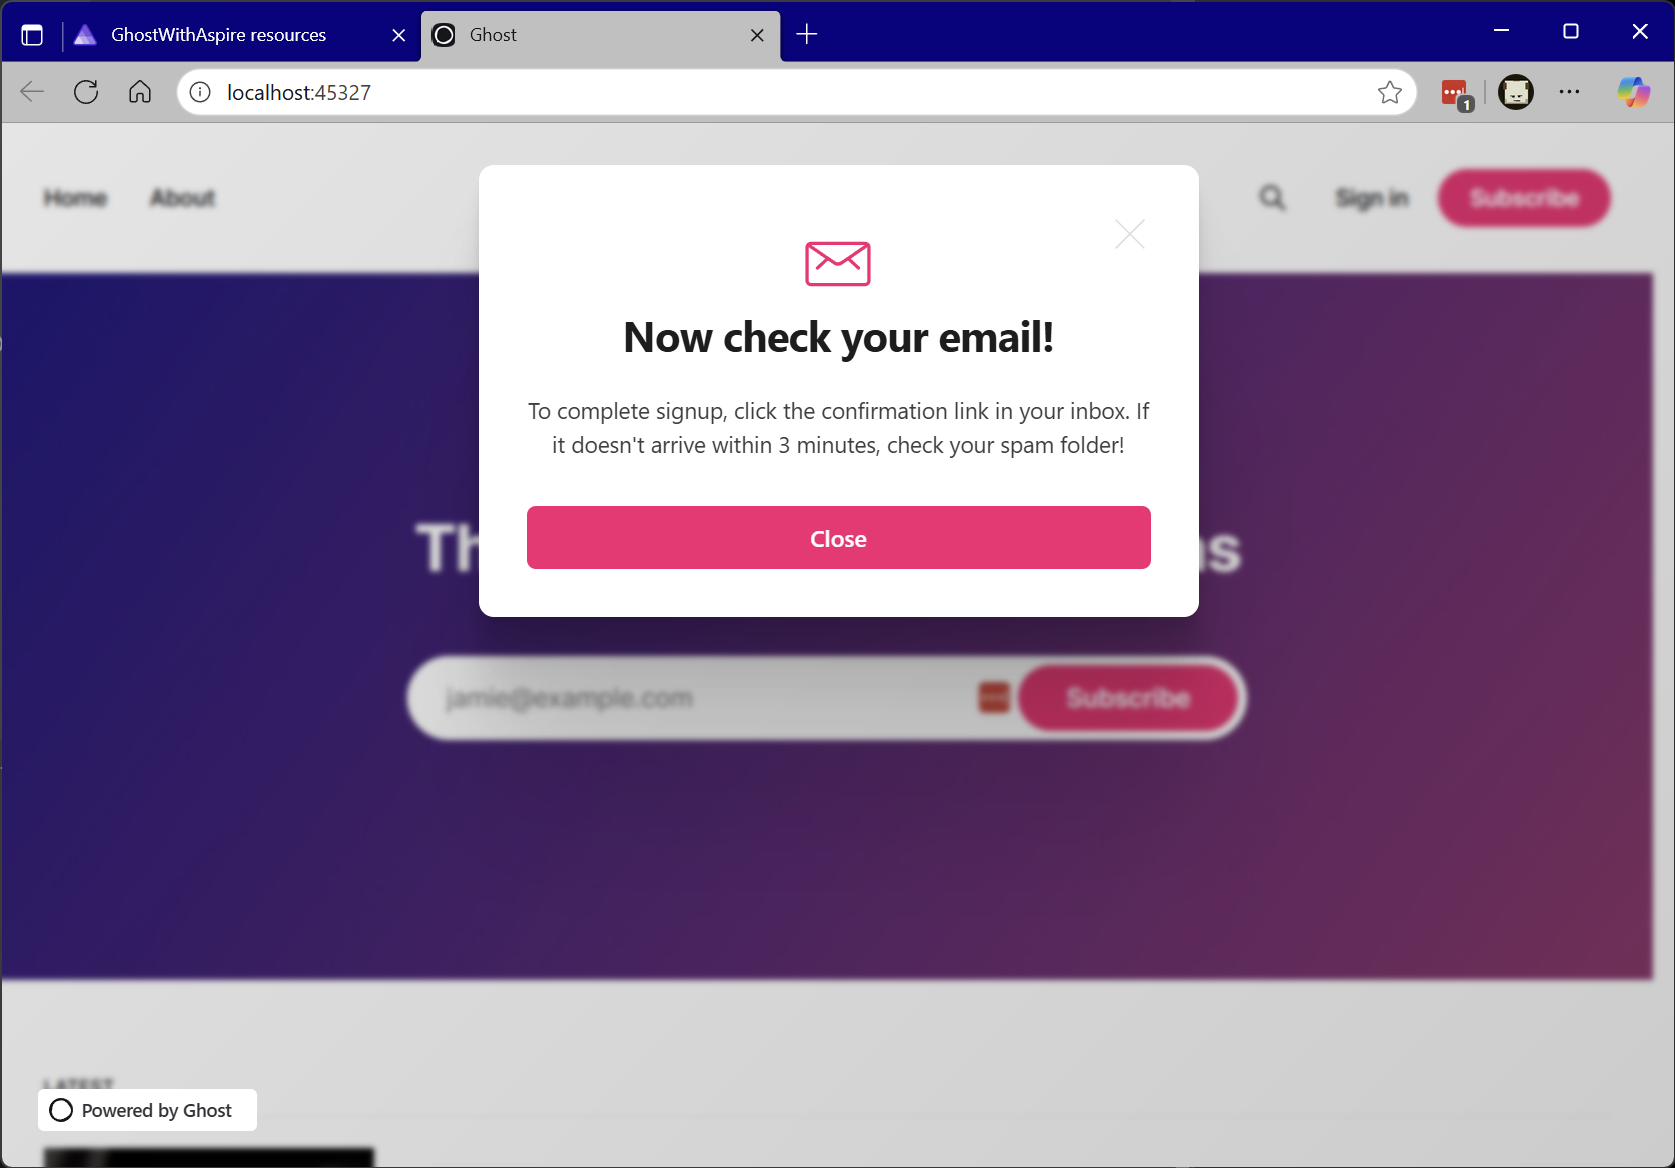
Once you run this revised code using aspire run and sign-up to the newsletter you should get a success message:
... and if you navigate to to mailpit from the Aspire Dashboard you should see a copy of the test message sign-up message.
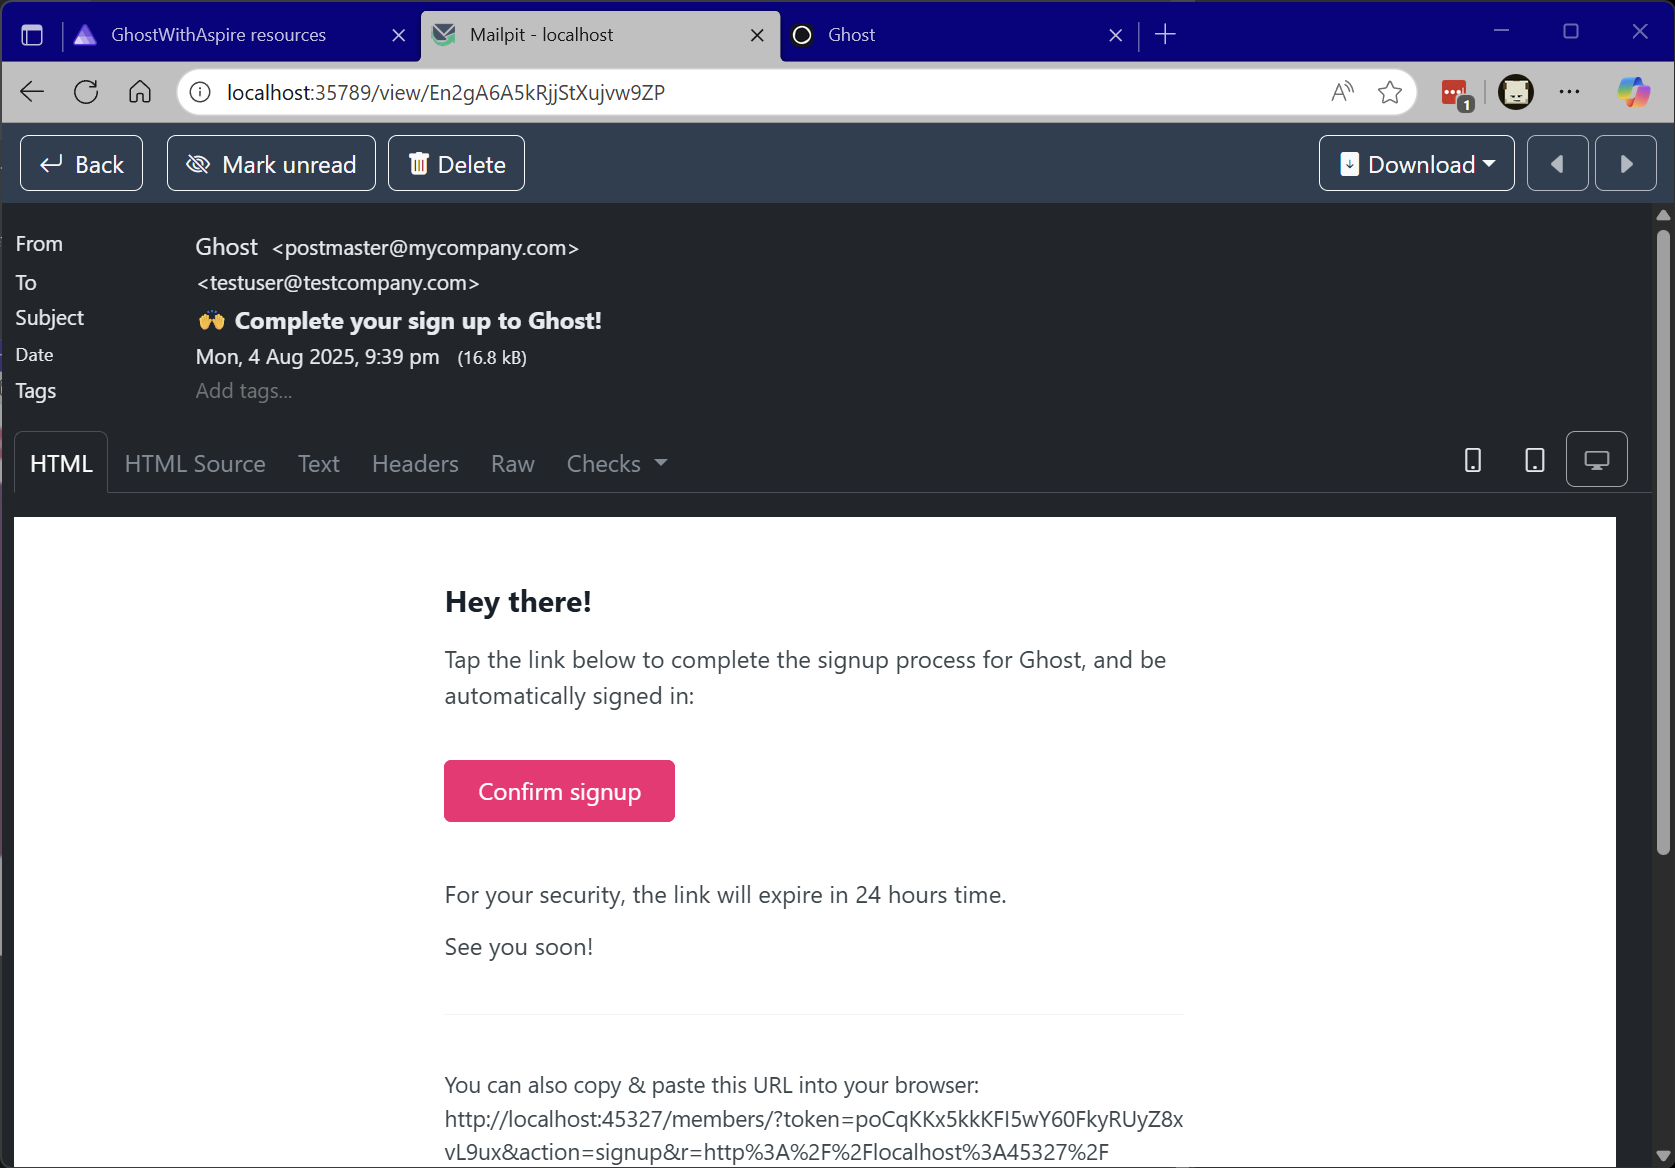
And of course, the link to confirm the sign-up just works and it is all running locally. You network and system administrators will be very happy that you aren't using a real mail relay to send your test messages!
It is unfortunate that we needed the work around mentioned above and it is something that we want to fix in Aspire. We have an issue tracking it here:
We are continuing to make more investments in our overall networking story for Aspire so that things "just work" in more scenarios. In most cases there are work arounds, but our goal is really for those work arounds to be unnecessary.
Wrapping up
This post is already way too long, and we've explored a lot of territory. I've shown the fundamentals of taking a pre-existing containerized application and integrating it with Aspire including plugging in other integrations and working around some of the nuanced container runtime networking issues that can sometimes happen with orchestrators.
I've uploaded all of the code related to this post to GitHub. It may get revisited in time as bugs in Aspire are fixed and new capabilities are added.